I like this truss rod,Rod. It works very well.
| Official Luthiers Forum! http://www-.luthiersforum.com/forum/ |
|
| Need help installing the Allied truss rod http://www-.luthiersforum.com/forum/viewtopic.php?f=10102&t=9468 |
Page 1 of 1 |
| Author: | Rod True [ Wed Nov 22, 2006 5:34 pm ] |
| Post subject: | |
Up till now, I've been using a single action, Gibson style truss rod which has a spline glued down into the channel, than the fb glued onto the neck. Well, now I want to start using a two way rod and I've purchased the Allied rod. My question is, how are these rods installed? Are they set down lower into the neck with a spline glued over top? Or do they sit flush with the top of the neck and than the fb glued on top. If the second, how do you ensure that the glue doesn't cease up the truss rod? Oh, I'm going to be installing for headstock access if that makes any difference. Thanks in advance. |
|
| Author: | Pwoolson [ Thu Nov 23, 2006 12:18 am ] |
| Post subject: | |
Hesh pretty much hit the nail on the head. You don't need a spline strip. I always put a small strip of masking tape over the rod just in case. I had a client once break a rod at the nut. He was out of town so he took it to a repair luthier who pulled the fingerboard and said that the reason it broke was that glue had seized the threads. Well, I'm pretty sure that, even if the glue had gotten down into the threads, titebond doesn't stick to metal. But rather than argue, I changed my install method just to make sure I have some insurance if it ever happens again. THIS IS IMPORTANT!!! Test the rod before you install it. I've talked to Todd about this and they got a bunch of bad ones. I've had three break on me and that really sucks when you are in final setup and have to pull the fretboard to change the stinkin truss rod. |
|
| Author: | TonyKarol [ Thu Nov 23, 2006 12:30 am ] |
| Post subject: | |
Before I test the rod prior to install, I also lube the end that will be buried under the FB, I use a spray router bearing lube here, then work the rod a bit to get the lube into the threads. It will turn even easier. |
|
| Author: | Bob Long [ Thu Nov 23, 2006 12:35 am ] |
| Post subject: | |
I also use that type of truss rod. I agree with what everyone has said. I put dabs of silicon caulk down in the channel before I install the rod... like maybe every 2 inches. I had one that buzzed once, but no prob. since. long |
|
| Author: | L. Presnall [ Thu Nov 23, 2006 3:02 am ] |
| Post subject: | |
In agreement with all...I do put a strip of regular old Scotch tape over the rod when I spread glue, then remove it before I put the fingerboard on...be careful to size your slot perfectly for a push-fit and you're good to go! |
|
| Author: | Rod True [ Thu Nov 23, 2006 4:40 pm ] |
| Post subject: | |
OK, got it, thanks guys tight fit with the cap of the truss rod. Test the rod prior to installation, breakage has happened with these rods, hope the manufacturing is getting better, these rods look some much thinner than the hot rod's from Stew-Mac, less wood to remove from the neck. strip of masking tape over the rod while spreading the glue, take it off before putting the fb down. Ok, so do any of you install for head stock adjustment? What about routing through the nut area? I seem to recall from some pictures that John Mayes designs for head stock adjustments of the truss rod. |
|
| Author: | John Watkins [ Thu Nov 23, 2006 11:47 pm ] |
| Post subject: | |
Fact - The LMI rod is made here and the Allied rod is made elsewhere. Opinion - Kind of like Snap-on vs. Harbor Freight. |
|
| Author: | Pwoolson [ Fri Nov 24, 2006 12:27 am ] |
| Post subject: | |
Rod, I adjust at the headstock. I usually have a fingerboard stop on my necks (see Bennedetto's book 'cause it's an entirely different discussion)to which the truss rod just slides under. |
|
| Author: | Dave Anderson [ Fri Nov 24, 2006 12:53 am ] |
| Post subject: | |
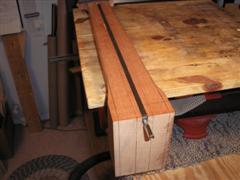
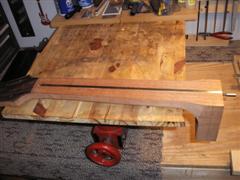
I like this truss rod,Rod. It works very well.
|
|
| Author: | L. Presnall [ Fri Nov 24, 2006 5:01 am ] |
| Post subject: | |
Dave, that looks like the rod we're speacking of... |
|
| Author: | L. Presnall [ Fri Nov 24, 2006 5:01 am ] |
| Post subject: | |
And I'm interested in the headstock access too...is there a separate thread on that one? |
|
| Author: | Rod True [ Fri Nov 24, 2006 5:04 am ] |
| Post subject: | |
Not yet Larry, but I think we should start one. |
|
| Author: | Dave Anderson [ Fri Nov 24, 2006 3:39 pm ] |
| Post subject: | |
Thats the allied rod guys 
|
|
| Author: | Scott van Linge [ Sat Nov 25, 2006 7:23 am ] |
| Post subject: | |
I tried a double acting rod, and was troubled by how much force it took to get the neck to move. I think that in principle, it's a great idea, but I see two problems with it. First, you have fine threads on each end, but when you have to move both threads to make an adjustment, then the thread pitch is effectively doubled, and the force necessary to push up or down in the rod's center is also doubled, plus twice the loss due to friction in the threads. This is in comparison with the force necessary to move a conventional compression rod up in the center. I suspect this may be a major factor in breaking them, welds aside. Second, once you have torqued the adjustment nut to gain the proper relief, then one end of the rod wants to rotate clockwise, and the other, counter-clockwise. This leaves a permanent twisting force on the neck, which seems wrong to me from an aesthetic point, if nothing else. I have no idea if it is enough torque to ever twist the neck in response. What is unique and desireable about this rod, of course, is that it fits in the slot that Hesh describes, and I use a 1/4" round bottom bit. The main advantage of this rod over the single acting rod is that it doesn't need a larger radius hole at the headstock end to accomodate the thrust washer the nut pushes against, weakening the neck/headstock joint. And I am unaware of whether anyone uses the single action rod adjustable at the soundhole. When I was at the Taylor factory in 2000, I saw that they use the standard compression rod, but when they glue up the fretboard to the neck, they clamp it to a caul that has a .050" rise in the middle of a long curve, which gives the glued neck much more relief than needed. Then, the nut easily moves their neck to the desired shape, without the need to ever bend it the other way. Looking to have the best of both worlds, I made a curved caul that only rose .020" in the middle, as it seemed enough for me. I bought the LMI two way rod and the nut they sell separately, with right hand threads. I then proceed to butcher the rod by sawing off the nut (which is on the left hand threaded end) and sawing the main bar just above the threaded nut/end block. I then unscrew the right handed end and drill out the threads in the nut. The threads on the rod are enough to allow the end to stick out about .350" past the nut end, and I then screw the extra nut down to what has become a thrust washer, basically. But one that is contained within the size of the rod, and needs no wider hole in the headstock for a washer. I then have a local guy weld the other end solid, and sometimes shorten the rod, since I prefer the 24 5/16" scale neck. And since neither end block has any torque on them when adjusting or resting, I can grind the bottom end round to fit the channel the router bit leaves. When I rout the slot, I use a fence and router bit from underneath the table when the neck block is still even width. I just continue the slot up into the headstock while leaving the fretboard surface flat on the table. I then glue on the head plate, and saw and file it to match the slot underneath. This gives enough room for the new nut end to lie below the surface. I end up with a single acting compression rod that causes minimal loss of strength to the headstock joint, and requires much less torque to raise the middle of the neck due to only turning one set of threads. The .020" relief I glue into the neck seems about right for the necks I've made this way. And when you've adjusted the relief, there is no unresolved torque in the rod. I hope this doesn't offend anyone who believes in the double acting rod. It's only my intention to suggest an alternative that may not really be necessary, but satisfies my requirements. Cheers, Scott |
|
| Author: | TonyKarol [ Sat Nov 25, 2006 8:33 am ] |
| Post subject: | |
I have to disagree with one thing Scott ... the fact that both ends are threaded, reverse at that, means that the rod moves twice as much than a std rod for a given amt of twist with the allen key. i find that 1/8 turn moves a neck plenty .. the rod is moving as much as 1/4 turn of a std style rod. |
|
| Author: | Scott van Linge [ Sat Nov 25, 2006 9:46 am ] |
| Post subject: | |
Tony, We're in complete agreement on your point. I didn't address that aspect, except to say that I thought it took a lot of force to get movement. I think your observation helps confirm this, in that it seems a given that the same amount of tension in the rod would be needed to give the same movement/lift, with either type rod. If only 1/8th turn on a 2 way rod gives the same tension/lift as 1/4th turn of a standard compression rod gives, it stands to reason that it would take twice the force to make that 1/8th turn to create the same amount of tension. I think this is another way of saying that two sets of threads have half the mechanical advantage as one, because they have twice the effective thread pitch. Scott |
|
| Author: | Rod True [ Sat Nov 25, 2006 9:52 am ] |
| Post subject: | |
I was going to mention the same thing as Tony did Scott. It's this reason why I'm switching to a double action rod, instead of the single action which I've been using up till now. I just believe that the double action rod can move the neck more if needed and also I like that fact that I don't have to build in any relief as I do with the single rod. The single compression rods work fine, but I just think that you can accomplish more with the double rod. Also, than you don't need to worry about a curved channel for the rod, not that making a jig for it is really difficult. I also feel that going to a double rod is sort of like upgrading the computer. The old one did a good job, but the new one will do a much better job. As for your double turned single action truss rod Scott, Shane Neifer at Highmountain sells this exact type of rod, you could buy from him with out all the head ace of modifying the LMI rod. Check it out near the bottom of the page. Thanks for the input though, it's always good to hear how others are doing things. |
|
| Author: | Serge Poirier [ Sat Nov 25, 2006 10:29 am ] |
| Post subject: | |
I also used Shane's single action rod on no 2 and have another one here for no 3 and it worked great. Wondering what the big difference is between Shane's rods and the double action that you're talking about guys, is the double action more reliable, easier to install? TIA Serge |
|
| Author: | Rod True [ Sat Nov 25, 2006 1:18 pm ] |
| Post subject: | |
No Serge, it's just that a double action can bend in both directions. You turn the nut one way and it bends the neck upward, you turn the nut the other way and it bends the nect downward. |
|
| Author: | Serge Poirier [ Sat Nov 25, 2006 5:14 pm ] |
| Post subject: | |
Thanks Rod, i'll stick with Shane's rods then! 
|
|
| Author: | Scott van Linge [ Sat Nov 25, 2006 5:14 pm ] |
| Post subject: | |
Rod, Thanks for the tip on Shane's truss rod. It looks just close to what I've done, without the trouble. I wrote to LMI a few years back, hoping they would build one like this. Scott |
|
| Page 1 of 1 | All times are UTC - 5 hours |
| Powered by phpBB® Forum Software © phpBB Group http://www.phpbb.com/ |
|